
Hace unos dias me compre un S20+ para cambiarlo por el mop pro que tenia , hay dos forma de integrarlo , por cloud y en local , yo lo he integrado en local con su IP y su Token para evitar toda la parte de cloud , le tengo asignada la IP 192.168.1.22 y el token lo extraje con Xiaomi VEVS

Una vez integrado de la forma habitual

Iremos a ajustes adicionales

Información de red

Al final de la sección veremos el token del dispositivo
Añadiremos en custom_components la integración Xiaomi MIOT en este caso la versión 0.7.22
En HACS buscaremos la integración , y la configuramos con ambos datos

Una vez añadido ya nos aparecerá la entidad
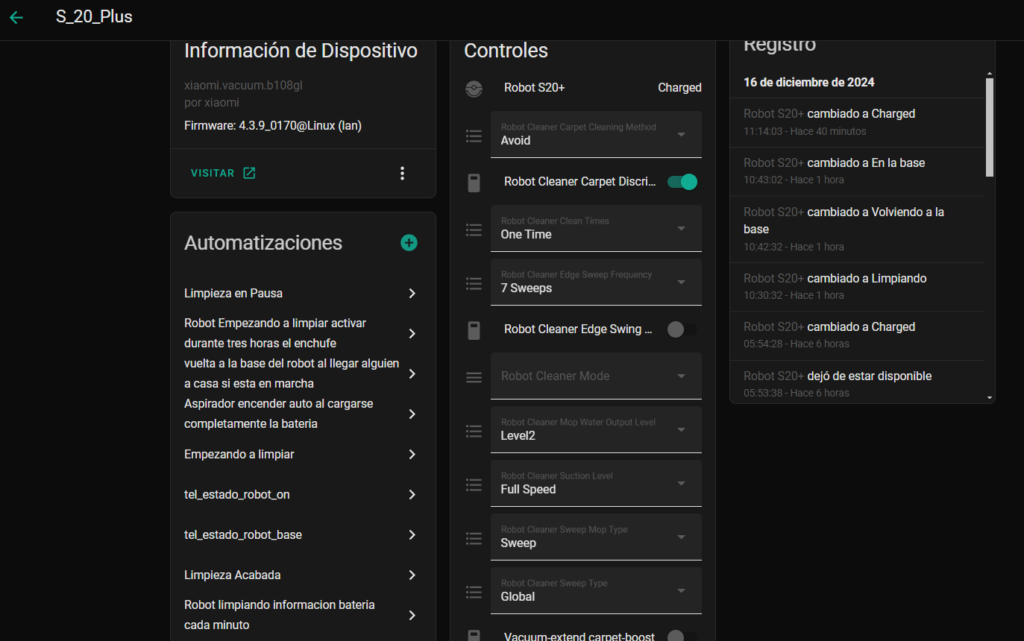
Ya podemos mostrarlo en lovelace

Lo tuneamos un poco en el customize.yanl
vacuum.xiaomi_b108gl_73fd_robot_cleaner:
  friendly_name: Robot S20+
  # icon: mdi:robot
  icon: 'bha:roborock'
Lo añadimos a la parte de gestión por telegram
    - service: notify.notif_telegram_bot
      data_template:
        # title: 'Menú'
        message: |
          {{"\U0001F300"}} *Estado robot aspirador* {{"\U0001F300"}}

          {{"\U0001f50b"}} *Bateria:* {{ states.vacuum.xiaomi_b108gl_73fd_robot_cleaner.attributes.battery_level }}%
          {{"\U0001F300"}} *Velocidad aspirado:* {{ states.select.xiaomi_b108gl_73fd_suction_level.state }}
          {{"\U0001f4ab"}} *Estado actual:* {{ states.sensor.xiaomi_b108gl_73fd_status.state }}
        data:
          inline_keyboard:
            - 'Aspirador ON:/estado_robot_on, Aspirador OFF:/estado_robot_off'
            - 'Aspirador Pausa:/estado_robot_pause, Aspirador BASE:/estado_robot_base'
            - 'Principal:/cancel'
Empezamos con las automatizaciones :
Aquí una para que vuelva a la base si entramos en casa y no nos de la brasa
- alias: vuelta a la base del robot al llegar alguien a casa si esta en marcha
  id: vuelta a la base del robot al llegar alguien a casa si esta en marcha
  initial_state: 'on'
  trigger:
    - platform: state
      entity_id: input_boolean.int_alguien_en_casa
      to: 'on'
  condition:
    # El robot esta limpiando
    condition: template
    value_template: "{% if states.sensor.xiaomi_b108gl_73fd_status.state == 'sweeping' %}true{%else%}false{%endif%}"
  action:
    - service: notify.notif_telegram_bot
      data:
        message: "{{'\U0001F300'}} Robot Xiaomi *parada y vuelta a la base* alguien en casa {{'\U0001F300'}}"
    - service: vacuum.pause
      entity_id: vacuum.xiaomi_b108gl_73fd_robot_cleaner
    - delay: 00:00:02
    - service: vacuum.return_to_base
      entity_id: vacuum.xiaomi_b108gl_73fd_robot_cleaner
Otra para que nos envíe la información de la bateria cada minuto mientras limpia
- alias: Robot limpiando informacion bateria cada minuto
  id: Robot limpiando informacion bateria cada minuto
  initial_state: 'on'
  trigger:
    - platform: time_pattern
      #cada minuto
      minutes: '/1'
  condition:
    - condition: state
      entity_id: vacuum.xiaomi_b108gl_73fd_robot_cleaner
      state: 'cleaning'
  action:
    - service: notify.notif_telegram_bot
      data:
        message: Bateria Robot *{{ states.vacuum.xiaomi_b108gl_73fd_robot_cleaner.attributes.battery_level | int(0) }}%*
Y a partir ahí va vuestra imaginación , y con esto y un bizcocho …..